Saturday, November 12, 2011

Freespace Cockpit start

So Ive finially gotten around to starting the Freespace Cockpit.  Ive grabbed some sheet metal, some offcut MDF from work (they were throwing out like $300 bucks worth of offcut sheets) and some spade bits for my drill.

So after the plannin stages of what dials and buttons would go where, i got started marking and drilling the holes from my plans.  Ive marked out the targeting array of buttons (The biggsest set ill have) and got to it.  As the steel can be wobbly when pressed in the middle, ive planned to have MDF backing behind it to increase its rigidity.  Unfortunatly, i cant just put the buttons into the MDF as many of them have only a 3-4mm shank length.


Topside view of the targeting array, with a few buttons put into it.

Into the backing MDF i drilled holes larger than the steel, to provide wriggle room for getting wires in.


Top sheet folded up and away to show holes drilled into MDF.

Saturday, May 7, 2011

I blame Mythbusters and James May

So, as is usually the case, I just had to do some trials before I got into the finishing of the black and the clear coats. I just had to test out a few automotive products I had to see what effect they came up with in comparison.
This came about as the rubbing compound I was told that was magic for the job was a complete disaster on its first run - it clogged stuff up, tore lint off the cloth, and just got so sticky and messy that I literally had to sand it out. I had a feeling i was 100% to blame however.

I drew up a nice little testing area complete with control and worked in some of the products. I figured out how to use the compound in the process and it come up superb. Its the second panel from the left, the one that looks like a frakking mirror.


Black coats

Well after another good weeks work I have nearly gotten to the end of the black coats. After a fair bit of painting and sanding and cutting through to the red I have actually come to the conclusion of doing multiple coats (3-4) before even attempting to remove orange peel. Its starting to look pretty good!


Unfortunately, there has been some fail crop up - lots of cracks like the ones below. After a lot of trying different things to remove it (and just having them re-appear when I re-painted), Ive narrowed it down to using a gloss paint. I have been using a flat black paint, but I ran out late one afternoon and decided to finish off with a black gloss I had (same brand/type/etc). I though id be able to paint over it OK, but those surfaces just cracked up. I lost nearly a frakking week trying to fix it - the only solution was to sand back to the red and start again.


Thankfully that has worked, and I'm back on track.

Monday, April 25, 2011

Tape down, operation black coat is a go

Well, finally I have cracked the sads with the red and have taped it to move onto the black coat. Eventually, I got into a loop of not being happy with the result, sanding more, sanding through to primer, repainting, etc. Its not all perfect, but Its going to be good enough to hit with rubbing compound after I pull up the tape. It was time to boot my OCD and just get on with it.


This is what I've come up with and have started painting with. Once the black is sprayed over that and sanded back to a flat sheen, I will pull up the blue painters tape, revealing the red below.

I have come across my arch-nemesis, water. One of the screws kept popping up through the red (below, screw removed) which I had to de-bog, rip the screw out, drill the hole out bigger and re-bog. There was no choice - covering it wasn't a option.


Also, I had some issues with swelling on some of the joints. I had gone back to primer on these bits but I though 'well, they wont be seen and will be painted black, and it hasn't cut through to the wood, so I can keep wetsanding'. Apparently this WAS NOT the case, and there has to have been a gap of some sort (even though these joints have been worked and re-worked more times that I care to remember). Thankfully, they have shrunk back after a day in the sun (The below pic is after shrinking - it was popped out about 5 times as much when it happened). I suspect a hit with a rough grit, re-prime well and continue painting will fix this up. Frustrating, yes, end of the world, hopefully not.

Friday, April 22, 2011

Red Basecoat down

Well, after a lot more work, I have coated the entire project with 2-3 coats of red spraypaint. I think ive gotten the hang of what I can and cant do with the paint.


This has taken another good 4 days to get to the point of having being pretty happy with the coats. The worst part is 95% of it wont be visible! The plan from here is finish sanding - I will give the whole lot a sand with 600 until most or all orange peel is gone (im ok leaving some orange peel where I know I will cover it with black), then 1200. Ill do this to give myself plenty of choice as to where to tape. When I decide on the locations, I will go over those parts with 2000 grit, dry, and then tape.

I did a good bit of work on the below peice - to the right is what it looked like all over after being worked on with 1200 grit. I was dissapointed with the result... So tonight I decided to give it a quick buff with some of the swirl remover stuff I had (not the rubbing compound Im going to get, but its something) juuust because I HAD to see if i was on the right track. Good news is, as you can see below, I am. I have buffed half of it to show the difference in colour and shine.

Bad news is, ill probly have to rough it back up to ensure the black spray paint sticks. But thats a bridge I will cross later!


Half Buffed, half left raw with 1200grit scratches in it. You guess which half is which.

Hopefuly tommorow I will have the whole lot sanded and taped ready for black paint!

Sunday, April 10, 2011

Priming Progress

So! Progress. I have been priming the case for.. uh.. 3 days now, and I have at least another day to go.

The case has gone from MDF light yellow to Primed Darker Yellow. Wheee! What sort of shenanigans are next?


Unfortunately, I have had epic amounts of problems with the joins. The bog just doesn't seal at all. I have seen lots of recommendations for using 2-part epoxy to seal joins, and i now wish I had a time machine to go back and follow the directions. I have bogged and rebogged and whatnot, and as soon as there's a few days of different temperatures, the bog either cracks or pops out of its joint. All I can do is smooth it out and lather primer on it ASAP, unless anyone has a time machine. My solution, for some of the worse joints, has been to f--king lather it with primer (massively against the rules, but whatever).


The section above the main buttons + joystick also gave me grief - I bogged it up again but when sanding it was hardly smooth - solution was to f--king LATER IT WITH PRIMER. It looks really smooth now - the surface tension has kept it rounded and a bit of sandpaper will smooth it out nicely!


As much as the rule is light coats, when I've run into trouble LATER IT WITH PRIMER has worked. This means a lot of sanding next round to remove the thick run off, but if you can do a good job of smoothing the runoff and do another coat and sand - its smooth again. The hope here is that the part just above the buttons ends up with a smooth curve up to the next piece of MDF and will paint + sand well (I'm sanding this bit by hand now) - so far so good.

I'm still scared of cracks showing up later but I'm well past the point of re-doing my joining method. Its time for suck it and see!


Above - the first coat of paint on the base bit. Here I really should have done a lot more light coast but I ran out of time (light dwindling). This is the first base coat of Red for the stripes, and the first base coat of colour on the entire damn thing!

Anyway, I did muck around on a scrap peice of wood and come up with the below results - with no priming or sanding or anything. Encouraging to say the least!

Saturday, April 9, 2011

The Plan (Number Six and Eight Approved)

So, the painting plan. Figured I might as well cover how I intend to paint this sucker for posterity (And if it fraks up you lot can learn from my mistakes).

Ive never done anything like this - so I've been working off a lot of research, forums. The 3 Ive read and re-read most are below:
So I've sorta amalgamated the above quite a bit into my own prefered way of attempting this.

Also, I had no idea WTF 'Orange Peel' was - HERE is a description. Basically, if a clear coat has a texture like the dimples on a orange peel.. Yeah, thats about it.

Also, at the very bottom of the post ive labeled what cans ive used for this job.

A picture of what im aiming for in this paint job (Not mine, from one of the tutorials above)


Prepwork (i.e. from base MDF)
Bog of some sort (I used Builders Bog), Good sanding block, and 60, 180, 400, 600 sandpaper (pref low-clog type)
  • Bog out all cracks in work
  • Sand progressively down 80, 180, 400, 60 grit sandpapers (Keep in mind, 60/80/180 grits are primarily for removing wood - if your woods already reality smooth skip right to 180 or 400. Even machined surfaces require prep. I used 60/80 for getting the two halves of my box in line - the top half was 5mm larger than the bottom in some places! This is where you use 60 grit - when its smoothing out you should be into the 400/800's)
  • Re-bog where necessary (this became much to frequent, and as Ive found later the bog Ive used just doesn't seem to work all that well for what I'm doing)
  • Finish with silky smooth MDF ready to paint (clean off with microfiber towels to ensure no grease or grit for priming step)
Priming
Spray can Primer Putty (Automotive), Sanding block and some 400/600 sandpaper from above (i used wet/dry), decent respirator
Somewhere to spray paint, lay down newspaper or preferable make up a spray booth. I made one out of plastic, some supports and a fan.
  • Give can of primer a good shake for >1min after hearing agitator
  • Spray 20-30cm away from case in thin strokes - starting and ending away from wood, thin coats.
  • Wait 5 mins
  • Repeat 2-3 times
  • After 20-30 mins (when touch dry, and only if required), flip/rotate to paint more (this is only a time-saver for me, if i left everything dry 200% properly id NEVER finish)
  • Leave dry for a hour or more
  • Sand with 400 grit sandpaper
  • Repeat 3 or more times as required (I often cut through to wood so some of the more tricky bits are 6+ times primed)
  • On the last round when I'm happy with results, sand with 400 and then 600 for silky-smooth finish for paint (and then clean off with microfiber towels to ensure no grease or grit for priming step)
As I'm currently aiming for a finish with red stripes around the case, I'm planning a basecoat of red paint, topped with black. Two reasons - all proper stripe jobs have the stripe colour first across the job, areas that want to remain the stripe taped, then the topcolour is the main colour. This means less frigging around with taping shit, and also seems to help with the edges of the tape (I tried it out, and this way works wonders for the edges, as pictures in my scrappy job below)


Paint coat
Spray cans for required colours, decent painters tape, newspaper, decent respirator
  • Spray multiple light coats onto wood, 2 light coats, rest for 5 mins, 2 light coats, up to 5 or 6 sets of passes
  • Let dry for 2 hours
  • Wet-Sand with 400 grit. Stay the frak away from the edge of the paintjob as edges come off like nobody's business
  • Repeat paint job until it looks good & flat
  • Sand second last job 600 grit
  • Paint again
  • Sand last coat 600, 1200, 2000
  • Let dry thoroughly (and then clean off with microfiber towels to ensure no grease or grit for priming step)
Clear Coat
Spray cans for required colours, decent painters tape, newspaper, decent respirator
  • Spray multiple light coats onto wood, 2 light coats, rest for 5 mins, 2 light coats, up to 5 or 6 sets of passes
  • Let dry for 2 hours
  • Repeat paint job until it looks good. I wont sand between coats, i will build up a LOT of coats and then sand out the orange peel.
  • Sand last coat wet 400, 600, 1200, 2000 - aim is to remove as much orange peel as possible.
  • Let dry thoroughly
Were not done! Get back to work!

Cut & Polish
Super fine cutting compound, swirl remover, terry cloth
  • Once clear coat is thoroughly dry, commence!
  • Put a bit of cutting compound on the terry cloth and rub into the clear coat
  • You want it to be a paste- keep going until its pretty much dissapeared into the finish.
  • After this has been done 6-8 times, break out the swirl remover. Change your terry cloth!
  • Apply swirl remover 4 or so times.
  • PROFIT!!!
After this, I will be letting it dry and looking into a strong wax protective finish. You know, just typing this makes me want to curl up into the corner and cry!


I have A new respect for Deulux - The clear coat has a clear lit, and the Matt Black has a dull black lid - my Glossy Black can (not pictured) has a glossy lid to diffarentiate it on shelf. Muchaso win, and shows good customer service IMHO.

Friday, April 8, 2011

Tip: Keeping aresol nozzles clean

So, after toying around on a scrap peice of wood, I've gotten the hang of these spray cans. However I've had substantial problems with blockages, especially the primer putty cans (for obvious reasons)

After a bit of trial and error, I have come across a process that works for me keeping spray nozzles clean.

After use (With putty stuff, do it every time you put the tin down, trust me)
  • Remove nozzle from can and put onto a tin of WD-40
  • Give it a spray with WD-40 into a bit of towel/scrap/paper
  • Clean nozzle facing with wet towel
  • DONT STICK CRAP INTO THE HOLE. This is more than likely to stuff up the shape of it and it will change the aerosol properties of the plastic.
If its already blocked, try leaving it in Metholated Spirits for a whille - or perhaps paint thinners. If all else fails, try a similar nozzle off another tin, or even keep spare nozzles if you end up buying multiple tins of the same paint/brand.


Sorry, gotta put this in!

Please do not look away from... The Nozzle

Thursday, April 7, 2011

Sanding completed

All parts have been sanded down to 600 grit - no pictures here as you cant really see the difference. Took me 4 days of working & Sanding it - from 10am till 7Pm with not many breaks. Who'd have thought id work myself harder on holiday than when im actually working?
Everything is super silky-smooth now so ill be moving onto painting.

I have made up a painting booth out of some plastic drop sheets, a broom handle, a mop handle, a peice of steel I found lying around and a fishing rod. I put on top of it a fan to serve as a exhaust fan (to keep dust and paint spores away from the paint job as much as possible). There's a few days of bad weather coming up so I hope to get painting after that clears.

Wednesday, March 23, 2011

Bogging and Sanding

Well now I'm back from Melbourne and the weather has been pretty good I've had a good chance to get into the project.

I have had to bog up the top half of the box and begin sanding it back. This has meant dragging out the table i got from work and getting myself set up outside.


I have split it into 3 parts - top, bottom and bottom flap. I am aiming to sand each down progessively through 80, 240, 400, 600 grit - when it is all down to 600 grit I will move on painting.

Monday, February 28, 2011

More prepwork

Whelp, a little more work on the Black Box. Not much, but ive bogged the inside in prepration for some more sanding.

I have 6 weeks off work now, so im hoping to really get into it over the next little bit!


Tuesday, February 1, 2011

Parts

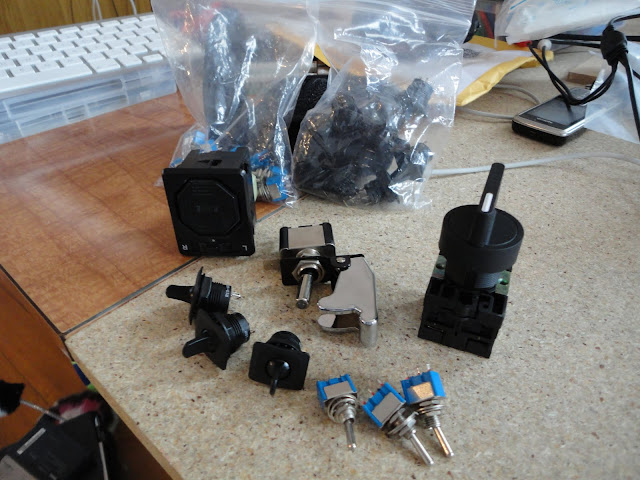
First batch of parts from china for the Freespace cockpit. There all win and quite cheap (about a quarter of the cost of buying them in Australia, and I struggled to find anything similar down here anyway)

The missile covered switch is win with its build-in LED.. however the shield strength switch (aka Toyota 4runner power window switch) its not as simple electrically as I hoped. Im confident i can hack it however.

Sunday, January 30, 2011

About time..

Finally started sanding the arcade box! Yeah, i know...

Went out and got myself some sandpaper (while I was buying some particle board to extend a old table I got for free from work) and some more bog to fill up the rest of the screw holes. So i got outside and spend a few hours sanding it to size with some 60 grit. The biggest problem has been the top part has a ever so slight bit of play along the piano hinge - which of course means massive variances at the end your playing at. Ive had to sand each side to match the other by putting it on a flat surface and sanding a bit, flip over, sand a bit more, etc. After a while, It's starting to all come together - while the edges arnt perfect yet there a massive improvment as now only a few bits feel raised, where when I started it have a overbite of about 4mm and was a good 1-2mm out on some parts of the side.

Unfortunately im not quite as in-shape as I could be.. After hours of sanding I noticed it was nearly 9PM and the light was gone so I packed up. Pouring a celebratory bourbon, I proceeded to nearly glass myself in the face due to my right arm suddenly responding to all commands by moving about 10 times more than it should have.

Ive done some research and settled on trying to use some decent spraypaint to paint it, after using a automotive putty/primer spraycan. A few goes of the putty/primer (with liberal sanding) should help me really fill in any gaps I have left.

As for colouring, Im still working out what i want to do with artwork.. But im starting to thing black with red lines might be the go (ala a Shivan cruiser.. Damn Shivans...)

Also... ive finially settled on a name. The Black Box, in honor of the phreaking done in the 60's & 70's (shit even 80s I think) - check it out on wiki HERE and even HERE.


Ive also done some work on the VGA->CAT adapters. One of them had its wires tear off their solder joints (damn cheap crap) which I had to re-solder. I suspect it has a lot to do with the bend that it gets internally - i had a right angle adaptor, then the adaptor, then the cable.. and when the lid was closing, it was hitting the cable and bending the whole lot sideways.

So I converted the VGA-CAT adapter itself to right angle mount to save 20mm to avoid this problem in the future. Ugly, yes. Effective, yes.

Tuesday, January 18, 2011

Aurora Chair Concept post

So I have a brand new project to begin! All I have to do is paint the arcade box.. Im getting there...

This one im pretty excited about. Blatantly ripping off the idea here ive decided to make my own racing/simulation cockpit. Its a Ottoman, which has a hollow storage area in the middle. When you lift the top off, it has a fold-up seat, and contains a G27 steering wheel, with pedals bolted down and a steering wheel frame. You sit inside it to play games, and pack it up neatly into a functional couch.

I was going to just build a frame, but a cockpit of sorts you could actually sit inside of sounded great. I, however, dont really need a couch, but i do need a new coffee table. When not in use, a top can be placed on it to create a coffe table. When in use, the lid comes out, the steering wheel is mounted on top of it, and its Gran Turismo 5 time.

This also couples with my Freespace cockpit project - a cockpit with switches/buttons/whatnot. It works like any keyboard, so its compatiable with anything that can accept a USB keyboard and bind buttons. So instead of fumbling with buttons to play the game, id be using switches/levers/etc to kill Shivans. Sick of trying to target a particular ship, and going past it, and having to go through all the ships again because you never bothered to bind 'previous ship' or cant be bothered typing 'Ctrl-Alt-Mac Key-Commodore Key-F' to fire primary lasers? This will be for you!


Features include:
  • Coffee Table
  • Racing wheel for GT5
  • Pedals reverse-mounted like a real car (push away, not push down like what comes with the plastic wheels you buy)
  • Subwoofer/Speakers
  • Bass Shakers (for force feedback for explosions/car engine/whatnot)
  • Swappable Steering wheel/Freespace cockpit
  • Custom built sequential/reverse shifter with a nice heavy feel (those plastic shifts dont do the wheels justice)


Crosssection of the box, with the right wall hidden for comparison


Closed up, a coffee table.


Seated view with the Racing wheel and custom sequential shifter to the left


Custom build freespace cockpit

DIY Bass shakers (Tactile Transducers)

Ive been fooling around with Tactile Transducers for the Aurora Chair project (upcoming). These little guys are like Subwoofers, but the produce more vibration than sound. This makes them great as force feedback, a fact I will be incorporating into the Aurora Chair project.

Below is a little DIY vid I did up for them, showing how to build a homebrew one. Unfortuantly, I turned up the vol and bass to max for the test showin in this and explordered the amp circuit, so im currently looking for some salvage.