Ive never done anything like this - so I've been working off a lot of research, forums. The 3 Ive read and re-read most are below:
- http://shoryuken.com/f177/how-paint-mdf-mirror-finish-worklog-191692/
- http://www.diyaudio.com/forums/construction-tips/83141-how-high-gloss-finishing.html
- http://www.theloudspeakerkit.com/pages/Painting-Guide.html
Also, I had no idea WTF 'Orange Peel' was - HERE is a description. Basically, if a clear coat has a texture like the dimples on a orange peel.. Yeah, thats about it.
Also, at the very bottom of the post ive labeled what cans ive used for this job.
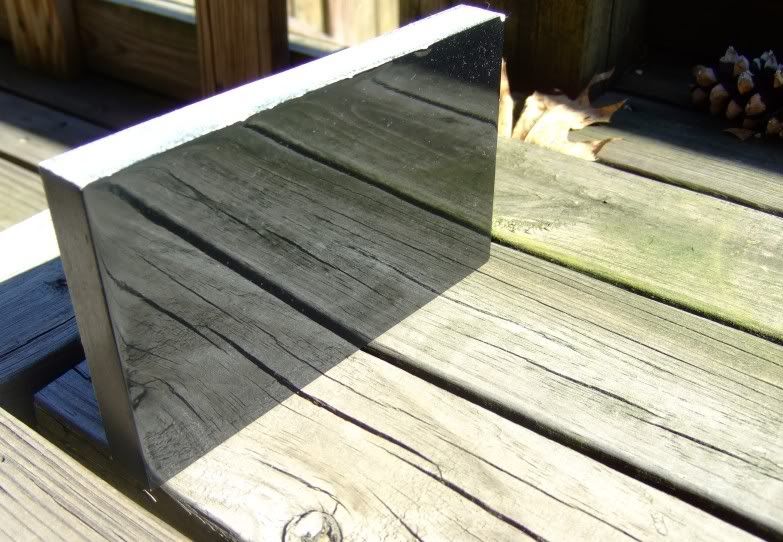
A picture of what im aiming for in this paint job (Not mine, from one of the tutorials above)
Prepwork (i.e. from base MDF)
Bog of some sort (I used Builders Bog), Good sanding block, and 60, 180, 400, 600 sandpaper (pref low-clog type)
- Bog out all cracks in work
- Sand progressively down 80, 180, 400, 60 grit sandpapers (Keep in mind, 60/80/180 grits are primarily for removing wood - if your woods already reality smooth skip right to 180 or 400. Even machined surfaces require prep. I used 60/80 for getting the two halves of my box in line - the top half was 5mm larger than the bottom in some places! This is where you use 60 grit - when its smoothing out you should be into the 400/800's)
- Re-bog where necessary (this became much to frequent, and as Ive found later the bog Ive used just doesn't seem to work all that well for what I'm doing)
- Finish with silky smooth MDF ready to paint (clean off with microfiber towels to ensure no grease or grit for priming step)
Spray can Primer Putty (Automotive), Sanding block and some 400/600 sandpaper from above (i used wet/dry), decent respirator
Somewhere to spray paint, lay down newspaper or preferable make up a spray booth. I made one out of plastic, some supports and a fan.
- Give can of primer a good shake for >1min after hearing agitator
- Spray 20-30cm away from case in thin strokes - starting and ending away from wood, thin coats.
- Wait 5 mins
- Repeat 2-3 times
- After 20-30 mins (when touch dry, and only if required), flip/rotate to paint more (this is only a time-saver for me, if i left everything dry 200% properly id NEVER finish)
- Leave dry for a hour or more
- Sand with 400 grit sandpaper
- Repeat 3 or more times as required (I often cut through to wood so some of the more tricky bits are 6+ times primed)
- On the last round when I'm happy with results, sand with 400 and then 600 for silky-smooth finish for paint (and then clean off with microfiber towels to ensure no grease or grit for priming step)

Paint coat
Spray cans for required colours, decent painters tape, newspaper, decent respirator
- Spray multiple light coats onto wood, 2 light coats, rest for 5 mins, 2 light coats, up to 5 or 6 sets of passes
- Let dry for 2 hours
- Wet-Sand with 400 grit. Stay the frak away from the edge of the paintjob as edges come off like nobody's business
- Repeat paint job until it looks good & flat
- Sand second last job 600 grit
- Paint again
- Sand last coat 600, 1200, 2000
- Let dry thoroughly (and then clean off with microfiber towels to ensure no grease or grit for priming step)
Spray cans for required colours, decent painters tape, newspaper, decent respirator
- Spray multiple light coats onto wood, 2 light coats, rest for 5 mins, 2 light coats, up to 5 or 6 sets of passes
- Let dry for 2 hours
- Repeat paint job until it looks good. I wont sand between coats, i will build up a LOT of coats and then sand out the orange peel.
- Sand last coat wet 400, 600, 1200, 2000 - aim is to remove as much orange peel as possible.
- Let dry thoroughly
Cut & Polish
Super fine cutting compound, swirl remover, terry cloth
- Once clear coat is thoroughly dry, commence!
- Put a bit of cutting compound on the terry cloth and rub into the clear coat
- You want it to be a paste- keep going until its pretty much dissapeared into the finish.
- After this has been done 6-8 times, break out the swirl remover. Change your terry cloth!
- Apply swirl remover 4 or so times.
- PROFIT!!!

I have A new respect for Deulux - The clear coat has a clear lit, and the Matt Black has a dull black lid - my Glossy Black can (not pictured) has a glossy lid to diffarentiate it on shelf. Muchaso win, and shows good customer service IMHO.
No comments:
Post a Comment